In this post I'm pleased to announce two things.
First, I've now incorporated Handheld exposure bracketing into MUSIC. My original handheld bracketing script, eg https://photography.grayheron.net/2019/10/hand-held-bracketing-script-update.html, was a standalone script that was based on some work from academia that attempted to optimise exposure bracketing for handheld high dynamic scenes, ie that require bracketing, typically with a wide angle lens.
In my variant I use the following logic in MUSIC:
- Select the base ISO, ie ISO 100, not auto ;-)
- ETTR for the highlights
- Trigger MUSIC handheld bracketing (see below)
- MUSIC will then do the following:
- Take the ETTR exposure at ISO 100
- Take the second exposure at the slowest handheld shutter and at ISO 100. In my case I use 1/30s, but you can change this in the script as you see fit
- Take the third exposure at the handheld shutter value and ISO 1600.
The ISO 1600 value is the start of the ISO invariance zone in my 5D3, plus being out of the pattern noise area. You may wish to adjust this for your camera, using https://www.photonstophotos.net/Charts/DXOPDR.htm to inform your ISO value, ie looking for the start of the linear slope. Remember, once you are at the start of the ISO invariant zone there is no point in increasing the ISO, ie just push in post.
Second, I've reconfigured the MUSIC UI around use cases: seven in total.
Use case 1 is not strictly a use case, simply MUSIC being in a normal mode, ie nothing has been changed. Use case 1 screen looks like this, ie all you can do is toggle to the next use case:

Before discussing the six actual use cases, a word on exposure modes. MUSIC does not check exposure modes but assumes M mode. MUSIC will/should work in other modes. ISO should be set to an explicit, non auto level. In some use cases, eg handheld bracketing, ISO should be set to the lowest available.
Use case 2 sets your camera up for Super Resolution (SR) capture and the MUSIC screen will change to look like this:

Here we see the SR menu items, where you can input the number of images you wish to capture, any start delay you may wish, whether bookends are to be used (I recommend always use bookends when bracketing), and whether you wish to enable Quick Access. QA is a new MUSIC feature that allows you to repeat the current MUSIC use case again, without going into the ML menus. All you need to do is a long SET press, ie greater than 3-4s between pressing SET and unpressing SET. A beep will occur to alert you that the MUSIC is ready to run.
SR mode is designed to run handheld, ie to ensure the camera is slightly moved between frames. FRSP is not available for the SR use case, nor does MUSIC check your shutter/exposure settings are fit for the SR use case.
[Note, originally I did experiment with an AF ‘jiggle mode’, but convinced myself this didn’t work, ie didn’t create the image to image movement that the SR technique needs. This also led me to remove all AF and lens movement in MUSIC, making it compatible with all ML cameras.]
Use case 3 sets your camera up for Noise Reduction (NR) capture and the MUSIC screen will change to look like this:

Once again you can specify the number of images you wish to take and MUSIC will tell you the NR you will achieve, ie SQRT(number_of_images_taken). The NR use case allows you to use FRSP capture, but, as with all FRSP captures, the shutter is limited to between 0.3s (say) and 15s. MUSIC will alert you if the shutter is outside the FRSP range: either in the MUSIC screen or when running.
Use case 4 sets your camera up for Long Exposure (LE) simulated/augmented capture and the MUSIC screen will change to look like this:

Here we see the LE use case provides you feedback on the LE time you are simulating, ie 0.4s in the above. Once again FRSP can be used with LE, but note that there will be a delay between image captures using FRSP.
Use case 5 sets your camera up for People Elimination (PE) capture and the MUSIC screen will change to look like this:

Here we see a new menu item appear to allow you to inject a delay between image captures, ie 10s in the above example. You can use FRSP, with all the caveats, with the PE use case.
Use case 6 sets your camera up for Hand Held (HH) bracket capture and the MUSIC screen will change to look like this:
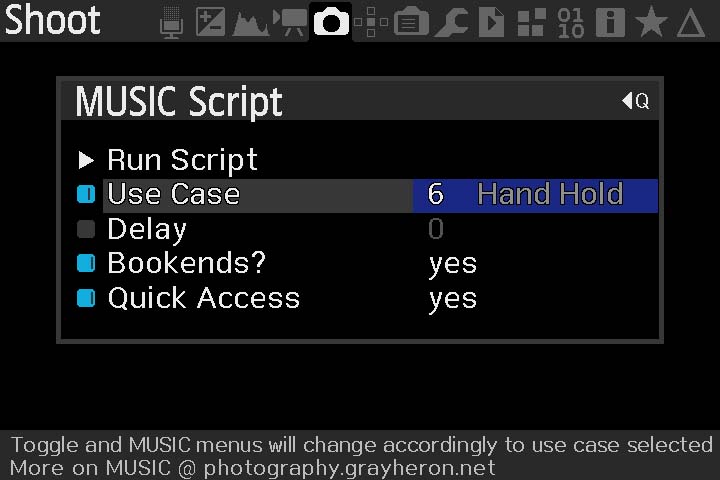
The HH bracketing use case will be useful in capturing high dynamic scenes where you can't or don't wish to use a tripod. Note MUSIC assumes you have set your set your first image at ISO 100 and that the shutter speed is an ETTR one, ie lower than the handheld limit.
Finally, use case 7 sets your camera up for FRSP (FB) bracket capture and the MUSIC screen will change to look like this:

This use case, where the camera must be stationary, ie on a tripod, allows you to silently exposure bracket a high dynamic range scene, eg in a cathedral. You can start by metering for the shadows or the highlights. As this use case uses FRSP, the usual FRSP limits apply, ie 0.3s to 15s 'shutter' times.
If starting from a highlight capture, eg after ETTRing, then you would select the +/++ logic. If staring from the shadows, eg after using the ML Ev spotmeter, then you would select the -/-- logic. Either way, MUSIC will capture brackets, at the requested delta Ev, until the FRSP limit is exceeded. As stated above, I recommend bookends be enabled for all bracket captures.
In all the above use cases, AF can be on or off, however, I personally would have AF off. Plus, make sure you have an explicit ISO set, ie not auto ISO.
In future posts, once I can get out again, ie after I've had my COVID-19 jab, I hope to provide real world examples of MUSIC in action.
As usual I welcome others trying MUSIC and always welcome feedback.
No comments:
Post a Comment