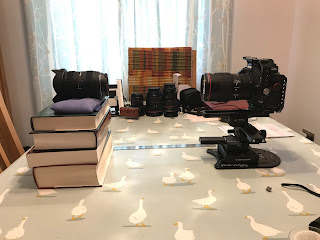
As we have seen in previous posts, on a photography lens, knowing the pupil magnification becomes important if you wish to know macro depths of field and the field of view as you change focus, eg FoV changes because of focus breathing.
One way to estimate the pupil magnification is to simply eyeball it. That is, by looking at the lens from the back and the front, you can guess the ratio of the exit pupil diameter to the entrance pupil diameter. Crude, but better than assuming it is unity, ie ignoring it.
Another way is to take an image of the in focus exit and entrance pupils, with a fiducial, eg a ruler, also in focus next to the lens, ie the ruler being in the same approximate plane of focus as the pupil. After scaling the images in Photoshop, so that the rulers are overlayed, one can measure the pupil diameters, ie in Photoshop pixels, and, once again, estimate the magnifications from the ratio of the exit to entrance diameters. This approach is much more accurate than eyeballing, but may be dependent on your aperture's design, eg number of blades. So, make sure you measure in the 'same' place:
The ultimate measurement approach is to use an optical bench or table, to locate the exit pupil along the lens axis. Of course, most photographers don't have an optical bench laying around: https://en.wikipedia.org/wiki/Optical_table
So I got thinking and decided to create my own 'poor man's' optical bench; and use it to see if I could estimate the pupil magnification.
After some experiments, my final arrangement looked like this:
The main part of my 'optical bench' is a cheap macro rail system, eg this one from Neewer, which I had laying around, unused ;-)
As we are interested in the pupil magnification (p), we need to find the location of the exit pupil, which is located on the lens axis at f(m+p) from the sensor.
Of course, with the lens being tested set to infinity, this collapses to f*p, ie the magnification (m) is zero at infinity.
Therefore, if we can measure the distance from the exit pupil to the sensor, we have a quick way of estimating the pupil magnification (p).
The optical bench will allow us to measure the exit pupil position relative to a know fiducial, in this case the end of the lens that mates with the camera.
The caveat being that we are assuming a planar, ie flat, exit pupil plane: which, according to the lens design, it may not be. If you wish to understand this, a great page is: https://www.photonstophotos.net/GeneralTopics/Lenses/OpticalBench/OpticalBenchHub.htm
For example, here is the exit pupil surface for a Canon 24mm prime, wide open (thanks to photonstophotos):
Whilst here is the exit pupil surface, once again wide open, for a Canon 24-105mm RF lens:
In other words: it's complex and not predicable, unless you know the lens design in detail! The best advise is to stop down, which forces the pupil surface towards the lens centre and thus towards a more planar surface.
We also know, from the manufacturer, what the flange distance is, ie the distance from the sensor to the surface that mates with the lens. For example the Canon EoS Full Frame cameras have a flange distance of 44mm:
Therefore, in the case of the Canon EoS, the pupil magnification (p) may be estimated from (d+44)/f, where d is the distance from the pupil to the end of the lens, which we will find using our 'optical bench':
- Set the lens you are measuring to the focal length of interest, if you have a zoom, and the focus to infinity;
- If necessary, reduce the aperture so you can clearly see the aperture;
- Compose things so you can see both the pupil and the end of the lens;
- Using your camera, wide open, focus on the pupil as best you can, ie zoom in LV and rock focus back;
- Note the position on the rail;
- Without touching the camera's focus, or moving the camera or lens, rack the macro rail until the surface that mates with the camera comes into focus, ie zoomed in and once again rocking focus;
- Note the position;
- If you wish, repeat the above and take an average.
You now have the distance (d).
As an example, let's take my 24-105 F/4L at 24mm.
First, let's look at the 'in-focus' pupil:
As implied above, if you zoom in don't expect a razor sharp image, as the exit pupil surface is a complex thing:
However, by rocking focus back and forward, you will find the best focus: accepting we are measuring at the edge of the exit pupil, and not on the optical axis; although stopping down the aperture of the lens we are measuring will help.
As for the image of the rear of the lens: that is easier to confirm:
Using my 'poor man's' optical bench, I measured d at 49mm, which gave me a pupil magnification for the 24-105mm, at 24mm, of 3.87, ie (49+44)/24.
So there you have it: three different ways you can estimate/measure the pupil magnification of a lens.
As usual I welcome feedback on this post: good and bad ;-)


No comments:
Post a Comment