As we know, a modern lens is a balance between high precision engineering and optical science.
You can't design or make a modern lens without a lot of computational tools, which most photographers will not have, eg ray tracing CAD packages etc.
Because mere photography mortals don't have such tools, or, bluntly, the need/desire, to access these tools, we tend to over compensate and make use of (highly) simplified models, such as the classic thin lens model:
But, as we know, the thin lens model breaks down as we approach the macro end, and fails completely for true macro modelling.
For this reason I personally make use of the so-called DOFIS model, which I've discussed in previous posts, here shown for a pupil magnification (p) >1:
This model provides all the information we need, through reference to the main cardinal 'nodes' or 'planes', to calculate depth of field etc, from macro to infinity, tilting or not tilting.
We make the reasonable assumption that the lens is operating in air, thus the cardinal nodes and principal planes, on the optical axis, are the same. We thus have:
- O: the object plane
- E: the entrance pupil (where the DoFs are calculated, the FoV has its zero and the Pano pivot is located)
- H: the front principal (and node), where the top of the J hinge is located when tilting
- H': the rear principal (and node)
- X: the exit pupil
- f: the focal length at infinity (as specified on the lens)
- I: the image plane
To complete the DOFIS model we need some other information, in order, for example, to calculate the hiatus between the principal planes:
- The minimum focus distance (MFD) at the given focal length
- The magnification at the MFD
- The pupil magnification (p) at the focal length, ie exit pupil diameter divided by the entrance pupil diameter
To help photographers understand how the above model works, I've created a lens simulator (LensSim) in the Desmos environment.
LensSim can be accessed on the right under 'My Simulators'.
LensSim has a help screen and is easy to use.
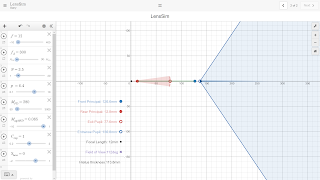
As an example, let's look at a 12-24mm Sigma lens, at 12mm. After entering all the data, which is readily available through the manufacturer or by direct measurement, LensSim gives us the following visualisation:
On the left we see the inputs and on the right a LensSim sketch of the layout of the lens, showing all the cardinal points, the hiatus and the (landscape) FoV.
LensSim allows you to change focus and thus see the impact of lens breathing on the position of the various cardinal points and the field of view.
To help visualise the details, LensSim has a slider called S_how. If S_how is -2, no lens details are shown. If S_how is -1, then only the image side is shown; if 1 then only the object side is shown; if 0 then the full lens info is shown.
LensSim should help you understand any lens you own, as long as you know a few basic pieces of information, that you can get from the manufacturer's specs or measure yourself.
As usual I welcome any feedback on this post.


No comments:
Post a Comment