Although some cameras offer ISO bracketing, none offer ‘intelligent’ use of both; for example, if you expose for the highlights and that base exposure is, say, 1/100s at ISO 400; then if you can ISO bracket, two additional exposure would be indicated at 1/100s and at ISO 1600 and ISO 6400.
But if you are using a lens shorter than say, 100mm, on a full frame sensor, you could also take further exposures, say one at ISO 6400 and 1/25s, ie creating a four bracket set with a delta Ev between brackets of 2 stops.
Yes you could change settings to switch from ISO to time bracketing, but as you are hand holding this is likely not to work out, as you composition will change radically as you switch strategies.
This is why I wrote the Auto Hand Held Bracketing Script: downloadable from the link on the right.
The script runs under Magic Lantern’s Lua module.
Once enabled, the script’s menu looks like this:
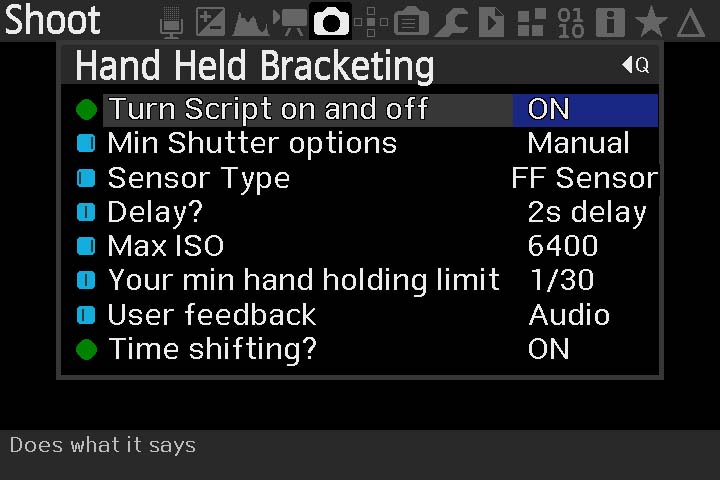
- ‘Turn Script on and off’ does what it says and simply allows you to control whether the script is active or not. If ON the script is run by doing a 3+ second half shutter press.
- ‘Min Shutter options’ are either Auto or Manual. In Auto the script chooses a suitable min hand held shutter speed based on the lens’s focal length (which it must report) and the lowest (1/30 or 1/60) shutter speed, which is also set in the menu. This ‘over ride’ covers the situation where you are using an extremely wide lens (see images below).
- ‘Sensor Type’ is simply there to explicitly tell the script if it needs to adjust for a crop sensor.
- ‘Delay?’ injects a 0, 2 or 5 second delay after the script initiates. Thus giving you a chance to compose yourself. You should switch off Canon delays.
- ‘Max ISO’ should match the maximum auto ISO in the Canon menu. For a ‘good’ camera, like my 5D3, I would set this to 6400. For my EOSM I would reduce this to, say, 3200 and possibly 1600.
- ‘Your min hand holding limit’ is used when you select Auto above. The script is written to provide you two options: 1/30s and 1/60s, but feel free to recode these to suit your needs.
- ‘User feedback’ has four options: no user feedback, audio feedback, led feedback and audio+led feedback. When using the script in non-LV mode, ie looking through the eyepiece, having audio feedback is most helpful as it signifies when the 3+ second condition has been achieved, thus allowing you to release the half shutter state and initiate the script.
- ‘Time shifting’ is either on or off. If on the script will try and take two time brackets at the max ISO, as well as the ISO brackets.
As for workflow, here is mine:
- Ensure ML ETTR in on and set to double press to initiate;
- Ensure Advanced bracketing is off;
- Set the script’s menu as required (note the menu state is remembered and will be reset at camera start);
- Set aperture and focus;
- Assuming I’m composing through the optical viewfinder eye piece, I will compose, then do a double half press to grab an ETTR Tv;
- I will then press the shutter half way and hold until I hear a beep, when I will let go;
- As I have selected a 2 second delay I know I have a buffer time to stabilise myself;
- The script will then take 3 or 5 images according to the menu settings and the base (highlight) exposure, ie the scene.
I also decided to use my 5D3 with my new Irix 11mm Blackstone lens. To give me a better chance with hand holding, I used an F/5.6 aperture and locked the lens to the appropriate hyperfocal, which I know with this lens, would give me an infinity defocus blur around 9 microns, with a near field, at 9 microns, of just over a metre.
As for post processing: it’s your choice, ie tone map, fusion blending or blending with masks. In the examples below, taken inside Winchester Cathedral, I ingested the images into Lightroom, HDR merged the brackets and processed them entirely in LR.
As usual I welcome feedback on this post.
The following images have been variously processed to explore 'their look'. However, due to the mixed lighting environment, I haven't spent any time in Photoshop 'correcting' the white balance across the images.


this looks GREAT. I'm going to try this in the New Mexico mesa...
ReplyDeleteLet me know how you get on. Also make sure you download the script that there now. There was a minor typo I corrected last night ;-)
Deletelooks great indeed!
ReplyDelete