There has been a lot of hype in the last week or so on the 'incredible' Sony touchless shutter app, that exploits the viewfinder properties to allow the user to trigger the camera by bringing their hand close to the view finder: http://goo.gl/NkW3SB
Of course as an Magic Lantern power user I've had this feature for a while...and more :-)
Assuming I'm on a tripod, eg shooting a landscape; I simply switch on motion detection, under the shoot menu, choose expo change, trigger level 8, detect size large and, say, a 1s delay.
I then switch the power user mode, ie Live View, which allows ML to give you a very rich set of information.
I compose, and in LV, use the depth of field feedback, now with diffraction correction thanks to yours truly, to set the focus. BTW as long as you keep the depth of field feedback white (and don't let it go orange) you are assured the best information on depth of field.
I then press SET to get an ETTR exposure setting. Then the ML magic happens: sorry Sony you are late to the party :-)
I simply wave my hand in front of the lens to trigger the capture in an touchless manner.
Once again, ML outshines all others.
Wednesday, April 29, 2015
Tuesday, April 28, 2015
Have some fun
In previous posts I have spoken about the great depth of field apps from http://www.georgedouvos.com.
In addition I have suggested a good read on depth of field, for the mathematically inclined, is Jeff Conrad at http://www.largeformatphotography.info/articles/DoFinDepth.pdf.
In this short post I wish to point you at a great depth of field simulator at http://www.dl-c.com/DoF/.

In addition I have suggested a good read on depth of field, for the mathematically inclined, is Jeff Conrad at http://www.largeformatphotography.info/articles/DoFinDepth.pdf.
In this short post I wish to point you at a great depth of field simulator at http://www.dl-c.com/DoF/.
Rather than explain how it works: just go and download it and have fun!
Monday, April 27, 2015
Into the Wild
This weekend was rather special for me, as I joined a group of fellow photographers from my club and had a day taking a Jeep tour into Canyon De Chelly. Wiki tells us that “Canyon de Chelly (də·shā′) National Monument was established on April 1, 1931 as a unit of the National Park Service. It is located in northeastern Arizona within the boundaries of the Navajo Nation.
Reflecting one of the longest continuously inhabited landscapes of North America, it preserves ruins of the early indigenous tribes that lived in the area, including the Ancient Pueblo Peoples (also called Anasazi) and Navajo. The monument covers 83,840 acres (131.0 sq mi; 339.3 km2) and encompasses the floors and rims of the three major canyons: de Chelly, del Muerto, and Monument. These canyons were cut by streams with headwaters in the Chuska mountains just to the east of the monument.
Canyon de Chelly is entirely owned by the Navajo Tribal Trust of the Navajo Nation. It is the only National Park Service unit that is owned and cooperatively managed in this manner. Approximately 40 Navajo families live in the park. Access to the canyon floor is restricted, and visitors are allowed to travel in the canyons only when accompanied by a park ranger or an authorized Navajo guide. In 2009 Canyon de Chelly National Monument was recognized as one of the most-visited national monuments in the United States.”
Our group went, on convoy, through the park using the Navajo owned Beauty Way Jeep Tours - http://canyondechellybeautywayjeeptours.com/: which I can recommend. Also, and nothing to do with photography, make sure you ride in a Jeep, and not ‘just’ a four-wheeled drive SUV. On the Canyon floor, especially going through the many, steep banked, streams, you need a Jeep. Here is a telling image of a trusty Jeep pulling a stuck 4-wheeler out of trouble:
 From a photography perspective, I decided to travel pretty lean and try out a few new things.
First, I used my Bad Elf data logger, set to 0.1Hz refresh. Although it was running all day (0800-1600) it worked flawlessly throughout the Canyon, and had plenty of battery to spare. The .gpx file was simply emailed from my iPad, which Bad Elf uses as the interface to the real world, and brought into Lightroom.
BTW, I am using LR-CC now, and apart from some GPU concerns, LR-CC seems to be working fine.
 I took two cameras with me, my 5DIII and my IR converted 50D. Both running my personal tweak of ML, ie with the depth of field info accounting for diffraction. As for lenses, I stuck with two on the 5DIII, my trusty 24-105 F/L and my ultra wide 12-24 Sigma. On my 50D I used my 10-20mm Sigma. Also on the 5DIII I used Auto-ETTR and Dual-ISO on every shot; and hand held every image.
To increase my agility, eg getting in and out of the Jeep and clambering over rocks, I used my Cotton Carrier vest for carrying my 5DIII, which meant my 5DIII was always available when I needed it and was securely locked on my chest when I was moving around, ie no swinging from a strap around my neck.
 This was the first time I had used the Cotton Carrier in earnest and I can report it was a great success. I will be using the CC in the future, especially when I need my hands free and wish to know my camera is safe... and when I don’t mind looking ‘nerdy’ :-)
Because I was using Dual-ISO on the 5DIII, I had the additional post-processing step of converting the Dual-ISO RAWs into 16-bit TIFFs. Some may find this a bind; however, I think it’s worth the processing cost to get a 3Ev boost in dynamic range. As I’ve said in other posts: the 5DIII with ML ETTR and Dual-ISO is a killer combination, ie I rarely bracket on a tripod these days, unless there is a clear need, ie focus bracketing or a very high contrast scene, eg in a church.
Another experiment I carried out, without a tripod to slow me down, was to see how well I could do with hand-held panos. I’m now using and sold on AutoPano Giga 4 pano stitching software. It simply handles anything I throw at it. As an example, I took a 9-shot hand held pano of the ‘group’ looking at some Navajo rock art. Here is one of the 24mm single image captures (a TIFF processed from the Dual-ISO capture):
 And here is the (highly reduced & scaled by 80%, JPEGed to the lowest I could get it) stitched 9-image pano (the AutoPano Giga file was a 318Mb, 9053 x 12309 image):
 Generally, because I was ultra wide, ie 12mm rectilinear on my 5DIII full frame, compositionally I tried to ensure something was always in the near field. The ML (diffraction) tweaked Depth of Field is a fantastic boon for me. All I need do is set the focus by looking at the LV data, ie not even pointing the lens at the subject in the field. Once I know, for example, my DoF is, say, Xcm to Infinity, all I need to do is adjust my composition to account for that focus, eg ensure my near field object is at least Xcm away from me. I then set the ETTR exposure via the SET button and take my ‘perfect’ capture. Life is good with Magic Lantern :-)
Finally, here are a couple of Canyon De Chelly images from the 5DIII: I’ll write about my IR shots in another post.

 Bottom line: You can take as many ‘practice’ shots as you like in your own home (as I do), but nothing beats getting out into the real (wild) world!
Reflecting one of the longest continuously inhabited landscapes of North America, it preserves ruins of the early indigenous tribes that lived in the area, including the Ancient Pueblo Peoples (also called Anasazi) and Navajo. The monument covers 83,840 acres (131.0 sq mi; 339.3 km2) and encompasses the floors and rims of the three major canyons: de Chelly, del Muerto, and Monument. These canyons were cut by streams with headwaters in the Chuska mountains just to the east of the monument.
Canyon de Chelly is entirely owned by the Navajo Tribal Trust of the Navajo Nation. It is the only National Park Service unit that is owned and cooperatively managed in this manner. Approximately 40 Navajo families live in the park. Access to the canyon floor is restricted, and visitors are allowed to travel in the canyons only when accompanied by a park ranger or an authorized Navajo guide. In 2009 Canyon de Chelly National Monument was recognized as one of the most-visited national monuments in the United States.”
Our group went, on convoy, through the park using the Navajo owned Beauty Way Jeep Tours - http://canyondechellybeautywayjeeptours.com/: which I can recommend. Also, and nothing to do with photography, make sure you ride in a Jeep, and not ‘just’ a four-wheeled drive SUV. On the Canyon floor, especially going through the many, steep banked, streams, you need a Jeep. Here is a telling image of a trusty Jeep pulling a stuck 4-wheeler out of trouble:
First, I used my Bad Elf data logger, set to 0.1Hz refresh. Although it was running all day (0800-1600) it worked flawlessly throughout the Canyon, and had plenty of battery to spare. The .gpx file was simply emailed from my iPad, which Bad Elf uses as the interface to the real world, and brought into Lightroom.
BTW, I am using LR-CC now, and apart from some GPU concerns, LR-CC seems to be working fine.
To increase my agility, eg getting in and out of the Jeep and clambering over rocks, I used my Cotton Carrier vest for carrying my 5DIII, which meant my 5DIII was always available when I needed it and was securely locked on my chest when I was moving around, ie no swinging from a strap around my neck.
Because I was using Dual-ISO on the 5DIII, I had the additional post-processing step of converting the Dual-ISO RAWs into 16-bit TIFFs. Some may find this a bind; however, I think it’s worth the processing cost to get a 3Ev boost in dynamic range. As I’ve said in other posts: the 5DIII with ML ETTR and Dual-ISO is a killer combination, ie I rarely bracket on a tripod these days, unless there is a clear need, ie focus bracketing or a very high contrast scene, eg in a church.
Another experiment I carried out, without a tripod to slow me down, was to see how well I could do with hand-held panos. I’m now using and sold on AutoPano Giga 4 pano stitching software. It simply handles anything I throw at it. As an example, I took a 9-shot hand held pano of the ‘group’ looking at some Navajo rock art. Here is one of the 24mm single image captures (a TIFF processed from the Dual-ISO capture):
Finally, here are a couple of Canyon De Chelly images from the 5DIII: I’ll write about my IR shots in another post.
Sunday, April 19, 2015
Customising Magic Lantern
As readers of this blog know, I’m a great believer in the power of Magic Lantern, however, up until now, changing and recompiling ML source code has been rather complicated.
Now, one of the ML team, see http://www.magiclantern.fm/forum/index.php?topic=14725.0, has found a easier way by creating a simple ‘compile in the cloud’ approach, so anyone, with a web browser can compile their own version of ML. At the moment the process is not 100% there, ie the Dual-ISO module doesn’t get compiled, but people are working to fix that.
Nevertheless, I thought this was a great opportunity to try out a few ML tweaks that I wanted to put in place, ie changes to ML functionality for my personal use.
The ‘test case’ I chose is to change the ML the depth of field (DoF) feedback, which, from previous posts you will know is a boon for landscape focus stacking.
Looking in the lens.c area of ML told me that the current ML code makes use of some reasonable assumptions, but does not account for diffraction.
Rather than bore the reader with reiterated ‘stuff’ that is freely available on the web, eg here http://toothwalker.org/optics/dofderivation.html, I will simply note that one can account for defocus and diffraction by combining the two in quadrature.
 Where the diffraction term can be estimated, in the visible bands, as N/750, where N is the aperture number, ie 2.8 or 16, and the result is in microns. Thus, at, say, F/16, the term becomes just over 21 microns.
The total acceptable blur, ie the combined defocus and diffraction effects, is a function of viewing distance and the sensor: but for my 5D3 I usually use a total blur of between 25-30 microns.
Thus we can work out the defocus blur, accounting for diffraction and the total acceptable blur, from the above, noting that the minimum occurs when the defocus and diffraction blurs are the same.
Once we know the defocus blur we need to note a couple of ‘conditions’. First, if the diffraction blur is greater than the total blur, then we will say we have gone beyond the diffraction limit. Secondly, we should respect that a defocus blur that is less that, say, two sensor pixel widths is most probably not sensible, ie just over 12 microns on my 5D3.
From others, we know the near and far limits of depth of field can be found from the following:
 Where u is the focus distance, f the focal length, N the aperture number, p the pupillary magnification, and c is out defocus blur. As many have found, other than for macro work, we can sensibly ignore the pupillary ratio, ie assume it is 1.
From the above we can calculate the hyperfocal distance, which, interestingly, is independent of pupillary magnification:
 We now have everything thing we need. The final step is ‘simply’ changing the ML C code and recompiling ML for my personal use, which is what I did.
Bottom line: although not for the faint hearted, I hope this short post has alerted others to the fact that you can change the ‘base’ ML functionality for your own use. In the example above, I now have the ML reporting, diffraction corrected, near and far focus distances and accounting for diffraction limits, ie the near and far distances collapse to zero when diffraction conditions are reached.
Now, one of the ML team, see http://www.magiclantern.fm/forum/index.php?topic=14725.0, has found a easier way by creating a simple ‘compile in the cloud’ approach, so anyone, with a web browser can compile their own version of ML. At the moment the process is not 100% there, ie the Dual-ISO module doesn’t get compiled, but people are working to fix that.
Nevertheless, I thought this was a great opportunity to try out a few ML tweaks that I wanted to put in place, ie changes to ML functionality for my personal use.
The ‘test case’ I chose is to change the ML the depth of field (DoF) feedback, which, from previous posts you will know is a boon for landscape focus stacking.
Looking in the lens.c area of ML told me that the current ML code makes use of some reasonable assumptions, but does not account for diffraction.
Rather than bore the reader with reiterated ‘stuff’ that is freely available on the web, eg here http://toothwalker.org/optics/dofderivation.html, I will simply note that one can account for defocus and diffraction by combining the two in quadrature.
The total acceptable blur, ie the combined defocus and diffraction effects, is a function of viewing distance and the sensor: but for my 5D3 I usually use a total blur of between 25-30 microns.
Thus we can work out the defocus blur, accounting for diffraction and the total acceptable blur, from the above, noting that the minimum occurs when the defocus and diffraction blurs are the same.
Once we know the defocus blur we need to note a couple of ‘conditions’. First, if the diffraction blur is greater than the total blur, then we will say we have gone beyond the diffraction limit. Secondly, we should respect that a defocus blur that is less that, say, two sensor pixel widths is most probably not sensible, ie just over 12 microns on my 5D3.
From others, we know the near and far limits of depth of field can be found from the following:
From the above we can calculate the hyperfocal distance, which, interestingly, is independent of pupillary magnification:
Bottom line: although not for the faint hearted, I hope this short post has alerted others to the fact that you can change the ‘base’ ML functionality for your own use. In the example above, I now have the ML reporting, diffraction corrected, near and far focus distances and accounting for diffraction limits, ie the near and far distances collapse to zero when diffraction conditions are reached.
Wednesday, April 8, 2015
Magic Lantern shows the way yet again
In previous posts I have spoken about the need for focus stacking. Not for macros, which is almost inevitable because of the shallow depth of field, ie of the order of a mm on my 100mm macro lens at a magnification of 1, but for landscapes.
When using very wide angle lens, we can usually ‘get away’ with a single image. For example on my 5DIII if I use my 12mm lens at F/16, and focus at about 2ft, ie just past the hyperfocal distance (based on a non-stressing blur circle), everything from about 1ft to infinity will be in acceptable focus.
But what if I’m using my 24-105mm F/4L at, say, 24mm. The hyperfocal distance is now about 6 ft, and my range of acceptable focus has ‘shrunk’ to 3ft to infinity, ie I’m losing 2ft in the near field.
Of course this only becomes an issue if you wish to ensure focus over such a large range. But let’s say you do. How should you focus bracket?
There are Apps out there to help you, eg the one I recommend is Focus Stacker from George Douvos, but this still leaves the problem of how to set the focus points on the camera.
Well Magic Lantern, once gain, is able to help, as long as you have a lens that reports focus information to the camera, ie like most Canon lenses or, from my experience, Sigma lenses..
To set up ML-enhanced focus stacking for landscapes, ensure the DOF display is on, under the ML Focus menu, and that you have the right units: I use cm for finer reporting. Then, in LV, you will see three pieces of critical information. You will see the distance you are focusing at, ie the third piece of info from right on the ML info bar. Above this you will see the near and far depths of focus.
As an example of how to carry out an ML-enhanced landscape focus stack, I set up a quick and dirty example in my kitchen tonight.
The daffodils were about 18in from the camera’s sensor plane, and at that focus, and at F/16, the depth of acceptable focus was about 6in behind and 3in in front, ie one image was not going to hack it.
So in LV, I simply noted what ML was saying, took my first image, and moved the focus ring such the second image overlaped the first, in focus. I then took another image, having noted the ML focus readings. Then moved to my second overlap point, where I noted ML said the front focus distance was infinity, and took my third and final image.
At no time did I look at the focus ring on the lens. I simply used the ML supplied information in LV.
I then ingested the images into LR. Made a few exposure adjustments on the first image, eg hightlights, and synced to the other two. I then exported to Photoshop as layers from LR, auto aligned the three images and auto blended them.
After making the return trip to LR I finished off the post processing, eg sharpening and softproofing for sRGB.
The resultant (usual boring) image shows that the scene is sharp from 18in to 'infinity'.
For me, once again, this shows the power of ML. Of course the ML side could be better, eg currently the user can not select the CoC or the pupil ratio, for the depth of field calculation.
Saturday, April 4, 2015
Shifting to tell a story
As photographers we know that selectively lighting or focusing allows us to bring drama to an image as well as helping us tell a story, for example by leading the viewers eye to a particular part of the image.
With a ‘normal’ lens, controlling the focus areas is rather limited to slices of focus orthogonal to the lens’s axis. It is possible to create defocus areas in Photoshop, but, sometimes, this can get out of control, ie creating non-contiguous focus zones that ‘give away’ someone has tinkered with the image in PS.
Another approach is to use a Tilt-Shift Lens. I personally have a TS-E 24mm f/3.5 L II, an incredibly sharp lens, helped by the fact it has large glass to handle the shift capability.
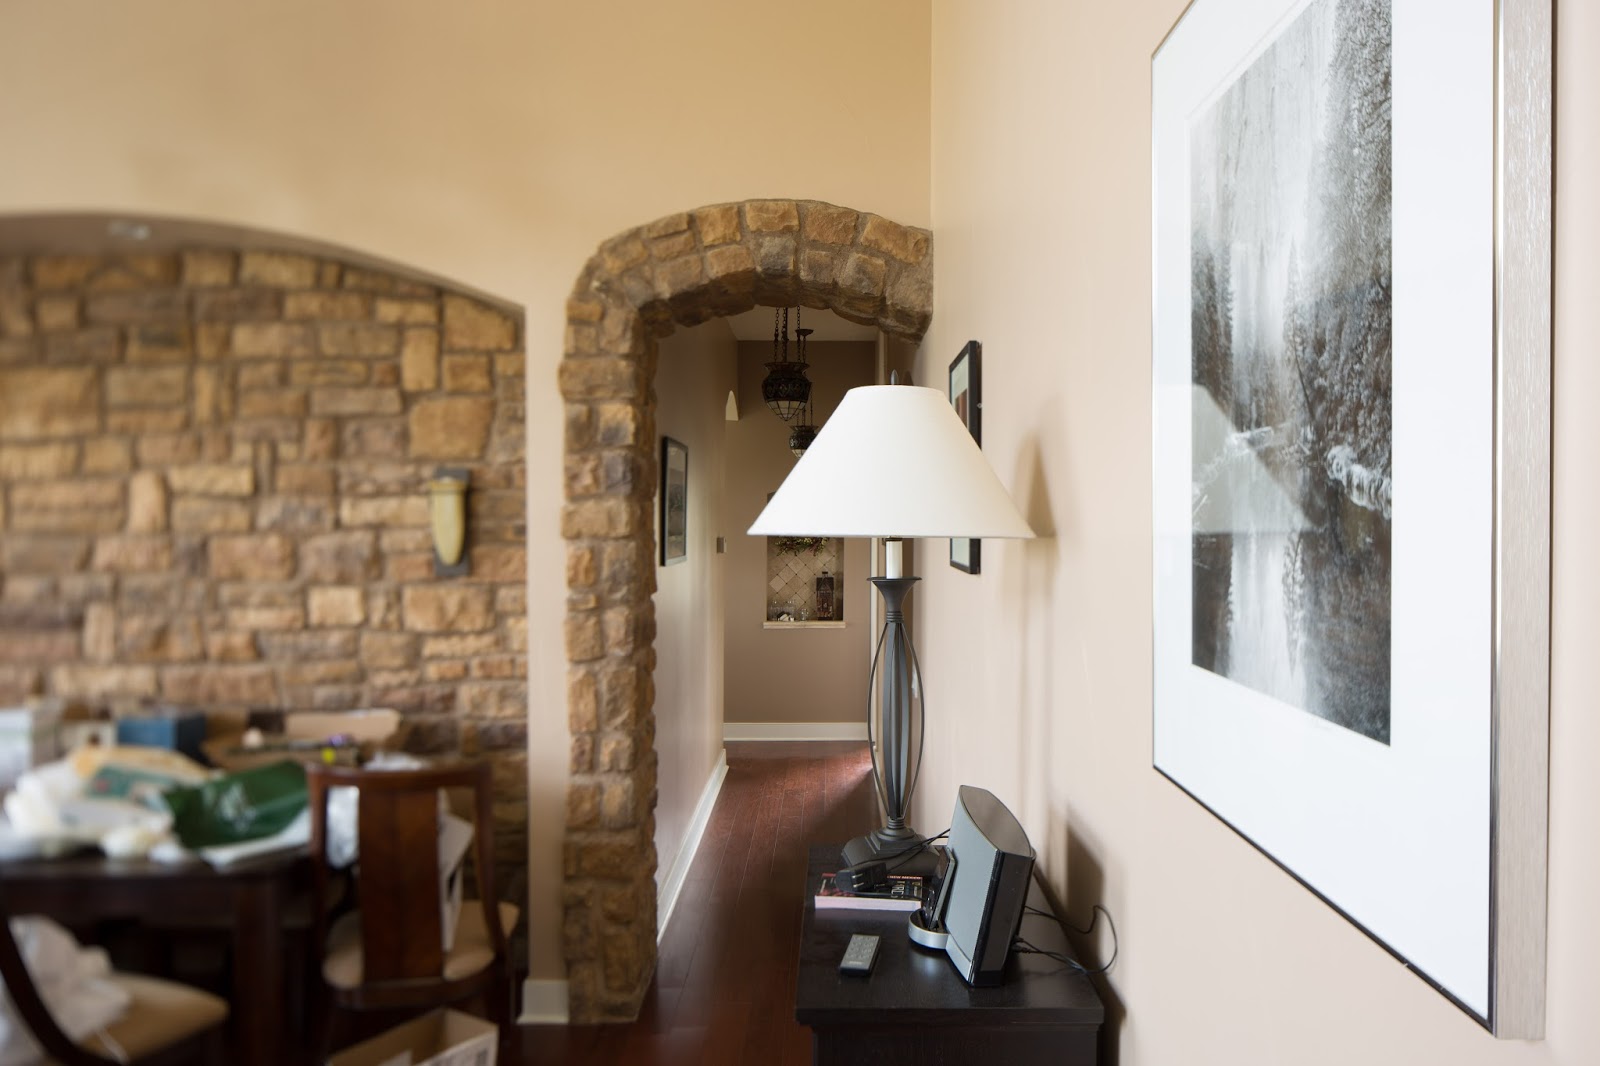
To illustrate what can be accomplished with this lens and only using Lightroom, I decided to capture a boring image in our home, that joined up two main elements in the scene: a large framed black and white print and some Tiffany-like ceiling lamps. To further show the power of Lightroom, I only used natural light to capture the scene, ie although I wanted to light the lamps, I decided to do this in Lightroom.
I placed my 5DIII, with the 24mm TS-E, at about 18in from the edge of the picture frame and selected an aperture of F/4.5, for a controlled focus ‘wedge’. At this aperture the hyperfocal distance is about 15 ft, thus giving an in focus zone (without shifting) from about 7.5 ft to infinity.
Thus if I wanted the lamps and the front of the picture frame in focus, I would have conventionally had to do some focus stacking, ie taking additional images at about 5.5ft, 3.25ft, 2.4ft and 1.75ft, ie to ensure the front edge of the picture and the Tiffany-like lamps were both in focus.
Of course focus stacking would have resulted in an image that was in focus everywhere, which was not what I wanted. In addition, because I wanted to see detail in the lamps I would have to have additionally carried out some exposure bracketing as well. Thus resulting, assuming three brackets, in 15 images, ie 3 and each of the 5 focus stations.
Everything changes with a Tilt-Shift lens.
So I composed the image and rotated by tilt plane to be vertical. As for tilt I started by using the 4.5 rule of thumb. That is the tilt is given simply by 9/(2d), where d is the distance in ft from the untilted sensor-lens centre to to the imaginary hinge point, around which the focus plane rotates.
In this case I estimated I wanted the hinge point at just under a foot, so to bring the picture and lamp into the tilted focus plane.
Having initially selected just under 5 degrees of tilt, into the plane (going the other way would have produced one of those miniature effects), I then used a simple iterative Live View process to rotate the focus plane into the correct position. The process being to focus for the foreground and bend (ie tilt) for the background. This resulted in a final tilt of just under 6 degrees.
As an aside I sometimes use the ML focus peaking in LV, but find this best suited for bringing a flat surface into focus, such as a floor.
For exposure I used Magic Lantern’s spot meter and positioned it on the Tiffney-like lamp at about -2.5Ev from the highlight clipping point. This resulted in a base (ISO 100) exposure of 1s. I them simply used ML’s auto bracketing to capture the required bracket set, ie at 1s, 1/4s and 1/15s. As mentioned in the last post, by starting at the slowest shutter speed, ML’s auto bracketing perfectly handles the remaining bracket set.
Here are the three ML generated brackets.

 I then ingested the three images into Lightroom and exported them to LR/Enfuse, all within Lightroom. I then tweaked the Enfused images and used various LR Radial Filters to relight the areas I wanted to. Here is the resultant image, clearly showing the narrow vertical focus wedge, centred on the picture and the ceiling lamp.
 I know that many will baulk at the $2000 price tag of the 24mm TS-E from Canon, however, IMHO this is the one lens any serious Canon shooter, who is interested in exploring photography, should ‘save up for’. It is technically untouchable and fun to use, especially with Magic Lantern helping you.
With a ‘normal’ lens, controlling the focus areas is rather limited to slices of focus orthogonal to the lens’s axis. It is possible to create defocus areas in Photoshop, but, sometimes, this can get out of control, ie creating non-contiguous focus zones that ‘give away’ someone has tinkered with the image in PS.
Another approach is to use a Tilt-Shift Lens. I personally have a TS-E 24mm f/3.5 L II, an incredibly sharp lens, helped by the fact it has large glass to handle the shift capability.
To illustrate what can be accomplished with this lens and only using Lightroom, I decided to capture a boring image in our home, that joined up two main elements in the scene: a large framed black and white print and some Tiffany-like ceiling lamps. To further show the power of Lightroom, I only used natural light to capture the scene, ie although I wanted to light the lamps, I decided to do this in Lightroom.
I placed my 5DIII, with the 24mm TS-E, at about 18in from the edge of the picture frame and selected an aperture of F/4.5, for a controlled focus ‘wedge’. At this aperture the hyperfocal distance is about 15 ft, thus giving an in focus zone (without shifting) from about 7.5 ft to infinity.
Thus if I wanted the lamps and the front of the picture frame in focus, I would have conventionally had to do some focus stacking, ie taking additional images at about 5.5ft, 3.25ft, 2.4ft and 1.75ft, ie to ensure the front edge of the picture and the Tiffany-like lamps were both in focus.
Of course focus stacking would have resulted in an image that was in focus everywhere, which was not what I wanted. In addition, because I wanted to see detail in the lamps I would have to have additionally carried out some exposure bracketing as well. Thus resulting, assuming three brackets, in 15 images, ie 3 and each of the 5 focus stations.
Everything changes with a Tilt-Shift lens.
So I composed the image and rotated by tilt plane to be vertical. As for tilt I started by using the 4.5 rule of thumb. That is the tilt is given simply by 9/(2d), where d is the distance in ft from the untilted sensor-lens centre to to the imaginary hinge point, around which the focus plane rotates.
In this case I estimated I wanted the hinge point at just under a foot, so to bring the picture and lamp into the tilted focus plane.
Having initially selected just under 5 degrees of tilt, into the plane (going the other way would have produced one of those miniature effects), I then used a simple iterative Live View process to rotate the focus plane into the correct position. The process being to focus for the foreground and bend (ie tilt) for the background. This resulted in a final tilt of just under 6 degrees.
As an aside I sometimes use the ML focus peaking in LV, but find this best suited for bringing a flat surface into focus, such as a floor.
For exposure I used Magic Lantern’s spot meter and positioned it on the Tiffney-like lamp at about -2.5Ev from the highlight clipping point. This resulted in a base (ISO 100) exposure of 1s. I them simply used ML’s auto bracketing to capture the required bracket set, ie at 1s, 1/4s and 1/15s. As mentioned in the last post, by starting at the slowest shutter speed, ML’s auto bracketing perfectly handles the remaining bracket set.
Here are the three ML generated brackets.
Wednesday, April 1, 2015
Maybe my last post on ML-based bracketing
As you will know from my previous posts, I try to get the most out of Magic Lantern, for example I look to use ML to allow me to travel light, ie in this case without a 1-degree spot meter.
BTW the ML spot is much smaller than the Canon spot metering area. Until I find out the actual numbers, I found this useful image on the web, which shows the four Canon metering modes relative to the 5DIII’s auto-focus area.
 When it comes to exposure bracketing, I believe an ML-based workflow represents the best you could ever hope to achieve. For this reason, I thought I would reiterate, what I believe, is the optimum exposure bracketing workflow for when you are on a tripod.
First make sure you have some ML settings switched on: that is under the Overlay Menu ensure Global Draw and Magic Zoom is on, with your preferred settings; and that the ML Spotmeter is on and set to RAW and AFBox, so that the ML spot meter is always in the centre of the AF box. Finally, ensure the RAW ML Histogram is on and set to Histobar ( I use the ML RAW histobar as a quick check when evaluating exposure, as it provides RAW feedback integrated over the entire scene).
Then, under the ML Shoot Menu make sure the Advanced Bracket is set to AxnEv (where n is your bracket Ev offset, eg 2Ev).
Once ML is set up, the optimised workflow goes like this:
That’s it: an ML workflow guaranteed to capture the perfect (exposure) bracket set; and all you needed was Magic Lantern and decide on the darkest details you wanted to capture.
BTW, as an extra, to test where your in-camera meter operates, relative to the RAW (sic) clipping point, all you need to do is put the camera in LV and point it at a surface (I use a single colour wall), so the LV screen shows a simple, flat image (make sure you are not casting a shadow on the image, which could move as you move and change the exposure).
Then adjust the shutter speed until the in-camera, Canon (sic) exposure meter shows 0Ev, ie it’s in the middle of the Canon scale. Then simply note what the ML RAW spot meter is telling you.
On my 5DMkIII I get an ML spot meter reading of -3.9Ev. Which tells me that the Canon 0Ev reading is just under 4Ev below the 100% highlight saturation point, which is why I choose -3Ev when setting the base bracket above.
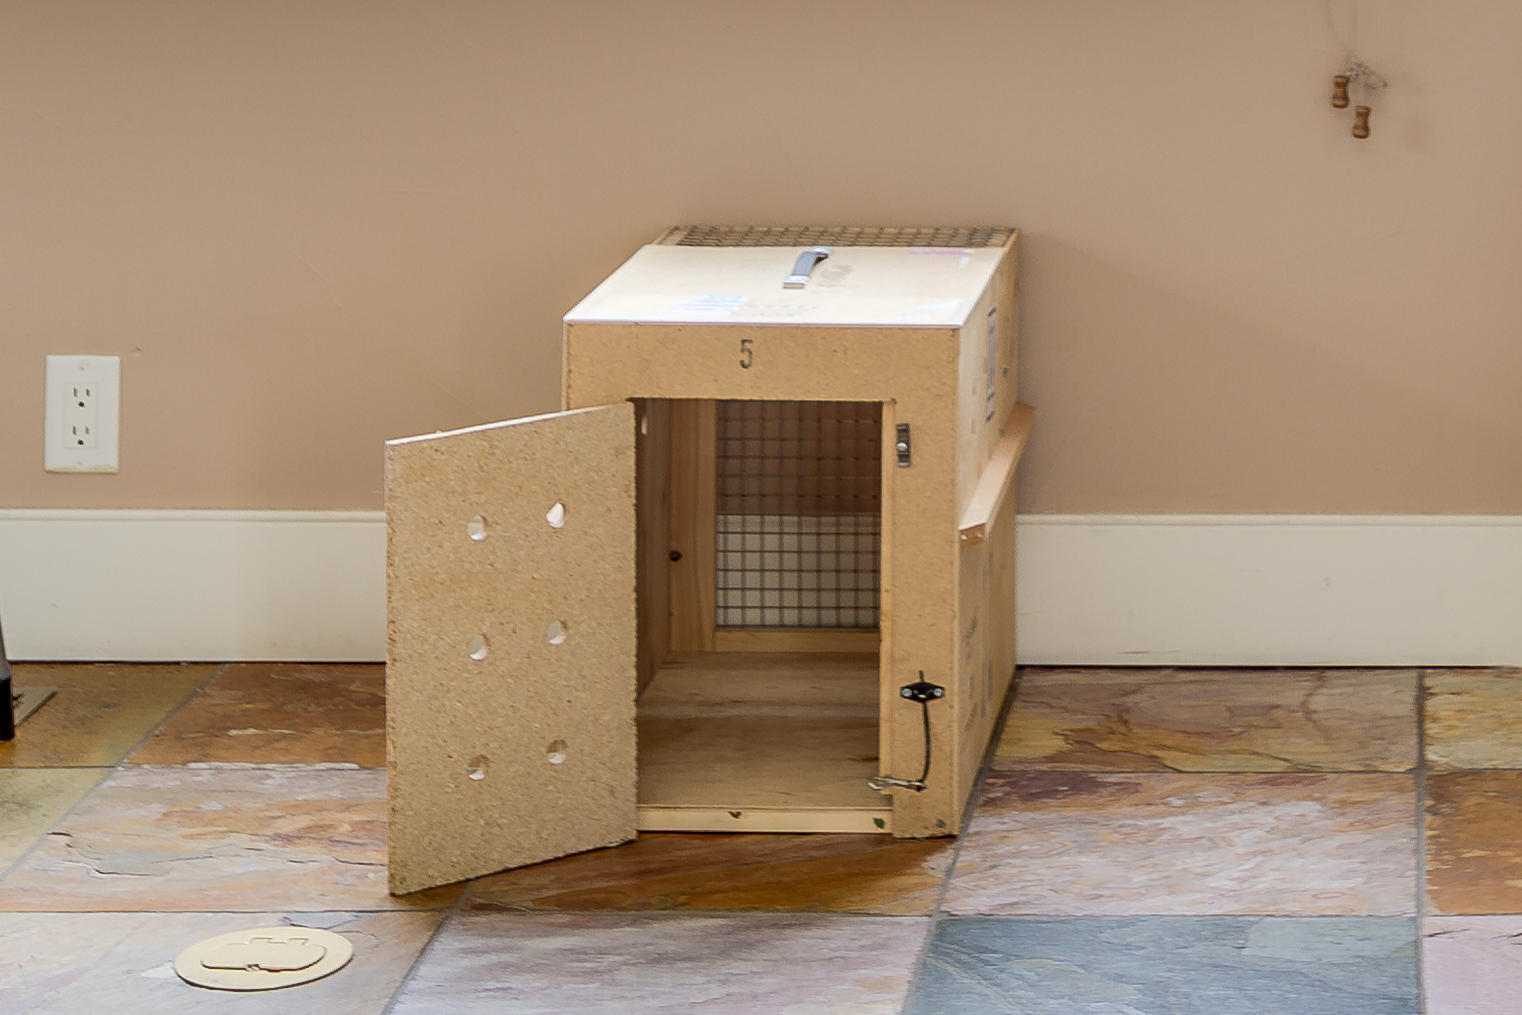
Finally, here is an unprocessed, ie flat, example. I decided the darkest area where I wanted to see the details was the wire mesh at the back of the cat box: so I moved the ML RAW spot meter so it was inside the box, and got a base exposure of 1.3s at -3Ev. The ML auto bracketing then added a further 5 exposures, with the last at 1/800s. From experience ML tends to give you one more exposure than is necessary, ie the exposure at 1/200 would have been OK. I see the extra ML bracket as highlight insurance.
I then used LR/Enfuse to create the final fused image. The first image below shows the Enfused full frame image, whilst the second image is simply a cropped version, showing inside the box. All I did with the crop was to open up the exposure in LR to show the captured detail covers all areas of interest, ie within the dark box and in the bright sky.

BTW the ML spot is much smaller than the Canon spot metering area. Until I find out the actual numbers, I found this useful image on the web, which shows the four Canon metering modes relative to the 5DIII’s auto-focus area.
First make sure you have some ML settings switched on: that is under the Overlay Menu ensure Global Draw and Magic Zoom is on, with your preferred settings; and that the ML Spotmeter is on and set to RAW and AFBox, so that the ML spot meter is always in the centre of the AF box. Finally, ensure the RAW ML Histogram is on and set to Histobar ( I use the ML RAW histobar as a quick check when evaluating exposure, as it provides RAW feedback integrated over the entire scene).
Then, under the ML Shoot Menu make sure the Advanced Bracket is set to AxnEv (where n is your bracket Ev offset, eg 2Ev).
Once ML is set up, the optimised workflow goes like this:
- Set the aperture as required;
- Compose the scene;
- Focus as required;
- Go to Live View;
- Move the focus box so that its centre is over the darkest area where you wish to see details, as we will use this metered area to set the base exposure;
- Adjust the shutter speed until the ML spot reading (in the centre of the focus box) reads about -3EV; the reason being that with the ML spot set as above, the EV reading is the exposure offset from clipping (see extra below);
That’s it: an ML workflow guaranteed to capture the perfect (exposure) bracket set; and all you needed was Magic Lantern and decide on the darkest details you wanted to capture.
BTW, as an extra, to test where your in-camera meter operates, relative to the RAW (sic) clipping point, all you need to do is put the camera in LV and point it at a surface (I use a single colour wall), so the LV screen shows a simple, flat image (make sure you are not casting a shadow on the image, which could move as you move and change the exposure).
Then adjust the shutter speed until the in-camera, Canon (sic) exposure meter shows 0Ev, ie it’s in the middle of the Canon scale. Then simply note what the ML RAW spot meter is telling you.
On my 5DMkIII I get an ML spot meter reading of -3.9Ev. Which tells me that the Canon 0Ev reading is just under 4Ev below the 100% highlight saturation point, which is why I choose -3Ev when setting the base bracket above.
Finally, here is an unprocessed, ie flat, example. I decided the darkest area where I wanted to see the details was the wire mesh at the back of the cat box: so I moved the ML RAW spot meter so it was inside the box, and got a base exposure of 1.3s at -3Ev. The ML auto bracketing then added a further 5 exposures, with the last at 1/800s. From experience ML tends to give you one more exposure than is necessary, ie the exposure at 1/200 would have been OK. I see the extra ML bracket as highlight insurance.
I then used LR/Enfuse to create the final fused image. The first image below shows the Enfused full frame image, whilst the second image is simply a cropped version, showing inside the box. All I did with the crop was to open up the exposure in LR to show the captured detail covers all areas of interest, ie within the dark box and in the bright sky.
Subscribe to:
Posts (Atom)