However, with the Christmas break now starting, I have managed to find some time to explore three ‘toys’: I mean early Christmas presents.
First, further additions to the growing family of Photoshop Luminosity Masking (LM) tools; second a fantastic new App for Sony shooters; and thirdly an excellent training video, that I’m looking forward to watching over the holidays.
As many know, I currently use two LM toolsets, that I find to be complementary: TKActions and Lumenzia. I also have Raya Pro, although I tend to favour TKActions and Lumenzia. I have now added a fourth LM tool to Photoshop, that I really like, namely ADPpanel+ from Arron Dowling at http://goo.gl/cf5ZTm
I hope to write more about ADPpanel+ in future posts, but for now I’ll simply recommend you review it. At less than $25, it’s worth a punt!
The Sony (in-camera) App I wish to mention, that I just purchased for less than $10, is Sky HDR: https://goo.gl/U2SYYq
Simply put, if you use graduated ND filters to hold back the sky in landscape photography, then this App is for you: and, of course, if you have a Sony camera that can play Sony’s Apps!
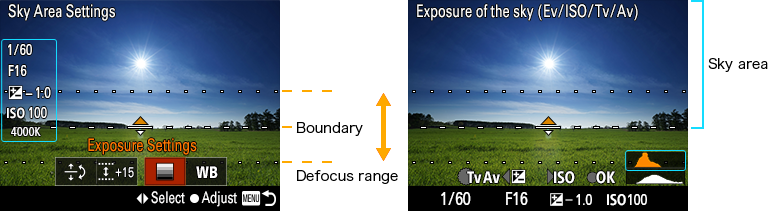
The App allows you to position the variable ND transition, vertically and in rotation; allowing you to set the exposure for the foreground and the sky, and adjust the feather of the transition, from hard to soft.
Being able to do this is impressive, but the App has two killer features. The first allows you to adjust the position of the ND after it has captured two images, one for the foreground and one for the sky. The second is that the App processes the two images in camera and saves the resultant image as a RAW: yes a RAW.
Unfortunately this evening’s weather was pretty bad, but I managed the following test image in my garden with my Sony A6000. With a close-in tree element, the composition isn't ideal for a graduated ND, as the graduated effect cuts through the near field tree: but this was only a quick test.
This is the single RAW capture, no highlights were blown out, using the Sky HDR in-camera App. I processed it in LR and applied a little Orton effect in PS.

My third early Christmas present was a video training course, which I’ll review after I’ve watched it. Unlike my usual video purchases, at a round $30-50, this one was $250.
Bottom line: now that I’ve started my Christmas break, and I’m off work for two weeks, I hope to be able to ‘play around’ with some photography, in between eating turkey and drinking some good beers!
Merry Christmas!


