One thing I’ve noticed when I scan the Magic Lantern forum, is the number of ML users that have difficulty with the ML enhancements, eg Auto-ETTR and dual-ISO, because they don’t appear to appreciate some of the ‘non-ML’ basics, especially dynamic range. In other words they are trying to ‘over drive’ the ML enhancements.
As an example, you will often see references on the ML forum to “pink artefacts” after processing a Dual-ISO capture. These references tend to be associated with very high dynamic range scenes, ie beyond the Dual-ISO capability.
Thus, IMHO, ML users run into difficulty when they don't fully appreciate the DR of the scene and/or their camera’s limits. As a reminder the (usable) DR may simply be stated as the brightness ratio between the lightest details you wish to capture and the darkest details.
Of course, the quality of your final image is highly dependent on the quality of the data you capture. If the quality of your in-camera captured data is poor, you are virtually guaranteed a poor final image. Data quality can only be degraded in post processing, never enhanced. Entropy will always win!
As we all know, photography is very simple: compose the scene, focus the lens, set the exposure, and push the shutter button.
But as has been discussed in some of my previous posts, to elevate yourself to a higher level as a photographer takes vision and requires artistry: things that need to be found from within, and not from posts such as this one.
However, putting vision and artistry to one side, if the quality of your (digital) capture data is poor, no amount of post processing will help create an image you will be proud of; unless your vision was some blurred and contrasty abstract image :-)
Coming back to the ML forum, and the problems some appear to have, I thought in this post I would share with you how I approach exposure setting, noting I’m a Canon-guy and a believer in Magic Lantern enhanced photography: http://www.magiclantern.fm
After much experimentation, I have settled on a three layered strategy for ‘simple’ exposure capture, ie capture may be complicated by other needs, such as focus stacking, that sit on top of getting the ‘best’ exposure. Thus in this post I’m ‘just’ addressing (Canon-ML-based) exposure setting.
The key, first step, is to evaluate the scene, ie the scene’s DR over the areas you are interested in capturing. I personally use a 1 degree spot meter if a can, but fall back to my camera's spot if I don't have my external meter with me.
BTW if you are using a long lens you will approach a 1 deg spot, but with a wide angle this, obviously, will not be the case. For example, if your full frame camera has a spot metering diameter of, say, 6mm, which is not atypical, then the spot angle, with a 50mm lens, will be about 7 degrees. Thus to turn your camera’s spot meter into a 1 degree spot, you will need to put a 300-400mm lens on. If you don’t know your camera’s spot meter characteristics, now might be a good time to find out.
Once I understand the scene's DR I decide on my capture strategy, according to the DR capability of my camera. For example, here is a very telling plot from Roger Clark at www.clarkvision.com, for a Canon 5D Mk II.
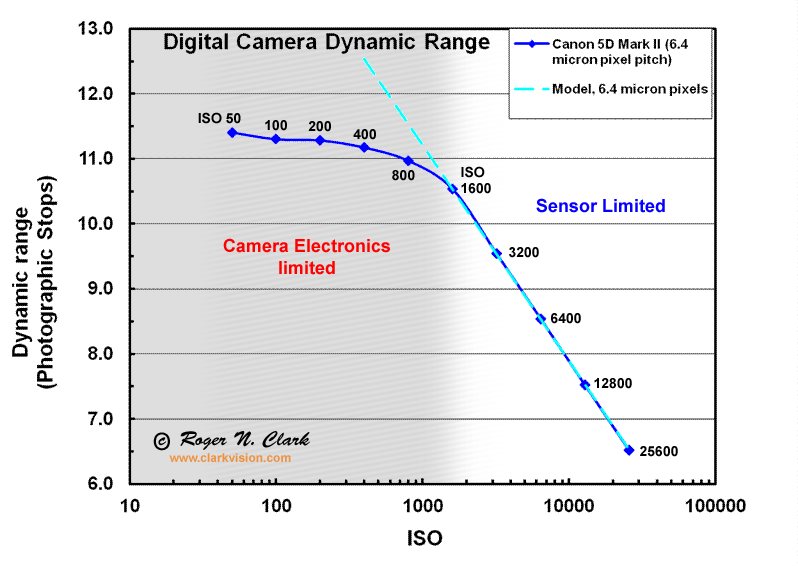 As can be seen, up until about ISO 1600, the DR capability of the 5DII is between 10.5 and 11.5 stops. Remember that ISO is a relative gain and has nothing to do with sensitivity or true exposure. ISO is simply a post sensor gain.
This plot also tells other interesting facts about the 5DII, which are generic to all digital DSLRs; that is, beyond a certain ISO, ie 1600 in this case, you are well advised to adopt a different exposure strategy, reflecting the change from electronic to sensor limited noise. That is, in the case of the 5DII, confidently use an ETTR approach below 1600, but not above 1600, ie underexpose here in preference to using ETTR. Also note banding in the transition zone indicates you may be need to raise ISO to 3200, ie away from 1600, so that sensor read noise swamps the banding.
For those that really want to know more about their cameras, I can’t do better than point you at Roger’s site.
Ignoring all the theory: what about the practice, and my three strategy layers?
For a low DR, ie covered by a single, non-Dual and ‘low’ ISO image, I will simply use ML's A-ETTR. This exposure strategy is guaranteed to give me the ‘best’ data for low ISO shooting. For high ISOs, ie above 3200, say, I will switch off A-ETTR and simply underexposure (to achieve the desire shutter speed) and recover the exposure in post.
For a scene with a 'medium' DR, eg 3 stops, say, on top of my Canon’s intrinsic capability, I will use A-ETTR with Dual-ISO. I very rarely use the Dual-ISO extra S/N features, as these take control away from me. I simply, use A-ETTR (with the base ideally at ISO 100) and switch Dual-ISO to 3Ev, ie the Dual scans are taken at ISO 800.
Finally, and always on a tripod, I use ML auto bracketing for very high dynamic range scenes, or scenes where I’m not sure of the DR and wish to give myself some insurance. Such scenes will likely be landscapes, especially towards sunset or sunrise, and indoor scenes, such as in churches.
In these cases, I first meter the darkest area where I wish to capture detail and set this as my base exposure. Then I'm guaranteed that ML auto bracketing algorithm will capture the best bracket set. What you don't want to do, IMHO, is to start ML auto bracketing 'in the middle'. It is much better to take control of the shadow capture and let ML ensure the highlights are covered.
As an example, I just shot this demo image for this post. I used my Canon 5DIII with a 24mm lens set to F/16 and focused just beyond the hyperfocal distance, ie at 8ft. I spot metered with my Sekonic L-758DR at the fireplace, and used this 1.6s exposure as my starting point. ML’s auto bracketing then added another three exposures at 0.4s, 1/10s and 1/40s.
After ingesting into LR, I exported the four images to LR/Enfuse and finished off in DxO OpticsPro 10.
 I hope the above is of some value to those experimenting with ML based exposure capture. The key takeaways being, know your sensor’s limits, estimate your scene’s dynamic range and adjust your exposure strategy accordingly, ie A-ETTR, A-ETTR with Dual-ISO, Auto-Bracketing from a shadow base.
However, putting vision and artistry to one side, if the quality of your (digital) capture data is poor, no amount of post processing will help create an image you will be proud of; unless your vision was some blurred and contrasty abstract image :-)
Coming back to the ML forum, and the problems some appear to have, I thought in this post I would share with you how I approach exposure setting, noting I’m a Canon-guy and a believer in Magic Lantern enhanced photography: http://www.magiclantern.fm
After much experimentation, I have settled on a three layered strategy for ‘simple’ exposure capture, ie capture may be complicated by other needs, such as focus stacking, that sit on top of getting the ‘best’ exposure. Thus in this post I’m ‘just’ addressing (Canon-ML-based) exposure setting.
The key, first step, is to evaluate the scene, ie the scene’s DR over the areas you are interested in capturing. I personally use a 1 degree spot meter if a can, but fall back to my camera's spot if I don't have my external meter with me.
BTW if you are using a long lens you will approach a 1 deg spot, but with a wide angle this, obviously, will not be the case. For example, if your full frame camera has a spot metering diameter of, say, 6mm, which is not atypical, then the spot angle, with a 50mm lens, will be about 7 degrees. Thus to turn your camera’s spot meter into a 1 degree spot, you will need to put a 300-400mm lens on. If you don’t know your camera’s spot meter characteristics, now might be a good time to find out.
Once I understand the scene's DR I decide on my capture strategy, according to the DR capability of my camera. For example, here is a very telling plot from Roger Clark at www.clarkvision.com, for a Canon 5D Mk II.
This plot also tells other interesting facts about the 5DII, which are generic to all digital DSLRs; that is, beyond a certain ISO, ie 1600 in this case, you are well advised to adopt a different exposure strategy, reflecting the change from electronic to sensor limited noise. That is, in the case of the 5DII, confidently use an ETTR approach below 1600, but not above 1600, ie underexpose here in preference to using ETTR. Also note banding in the transition zone indicates you may be need to raise ISO to 3200, ie away from 1600, so that sensor read noise swamps the banding.
For those that really want to know more about their cameras, I can’t do better than point you at Roger’s site.
Ignoring all the theory: what about the practice, and my three strategy layers?
For a low DR, ie covered by a single, non-Dual and ‘low’ ISO image, I will simply use ML's A-ETTR. This exposure strategy is guaranteed to give me the ‘best’ data for low ISO shooting. For high ISOs, ie above 3200, say, I will switch off A-ETTR and simply underexposure (to achieve the desire shutter speed) and recover the exposure in post.
For a scene with a 'medium' DR, eg 3 stops, say, on top of my Canon’s intrinsic capability, I will use A-ETTR with Dual-ISO. I very rarely use the Dual-ISO extra S/N features, as these take control away from me. I simply, use A-ETTR (with the base ideally at ISO 100) and switch Dual-ISO to 3Ev, ie the Dual scans are taken at ISO 800.
Finally, and always on a tripod, I use ML auto bracketing for very high dynamic range scenes, or scenes where I’m not sure of the DR and wish to give myself some insurance. Such scenes will likely be landscapes, especially towards sunset or sunrise, and indoor scenes, such as in churches.
In these cases, I first meter the darkest area where I wish to capture detail and set this as my base exposure. Then I'm guaranteed that ML auto bracketing algorithm will capture the best bracket set. What you don't want to do, IMHO, is to start ML auto bracketing 'in the middle'. It is much better to take control of the shadow capture and let ML ensure the highlights are covered.
As an example, I just shot this demo image for this post. I used my Canon 5DIII with a 24mm lens set to F/16 and focused just beyond the hyperfocal distance, ie at 8ft. I spot metered with my Sekonic L-758DR at the fireplace, and used this 1.6s exposure as my starting point. ML’s auto bracketing then added another three exposures at 0.4s, 1/10s and 1/40s.
After ingesting into LR, I exported the four images to LR/Enfuse and finished off in DxO OpticsPro 10.
No comments:
Post a Comment