Sunday, March 29, 2015

Hazy Days of Summer

We soon learn as photographers that there are ‘sweet times’ to capture our landscapes , eg around sunrise and sunset, but not midday. Or, if you have an IR converted camera, then midday will also be a sweet spot, ie more IR photons from the Sun.

But what if you are in place at the ‘wrong time’, eg at midday, and you just can’t wait until the the Sun sets. In this case, you may well have to contend with atmospheric haze (for example see http://www.spc.noaa.gov/publications/corfidi/hazeintro.html In addition you will also have enhanced UV to contend with.

Reducing haze through the use of UV filters is not really needed now, since our digital cameras sensors are not sensitive to UV light like film was. The use of a polarizing filter may cut haze, but only under the right lighting conditions.

So the ‘best’ way to reduce the impact of haze is via post processing.

It is speculated that the next release of Photoshop may well have a ‘de-hazing’ capability: https://www.youtube.com/watch?v=6aXvOlscOIk

For those who can’t wait for the next Photoshop release, there are Plug-ins, eg NeutralHazer from Kolor: http://www.kolor.com/neutralhazer

Another tool, and one I use, is the Clear View technology built into DxO Optics Pro 10. As an example of what this can achieve, here is a ‘classical’ Sunny-16 shot, ie 1/100s at ISO-100 at F/16.

The RAW was processed in DxO Optics Pro 10 and, as can be seen, the Clear View technology has helped to bring out some ‘hidden’ details in the sky.

Images
Sunny-16 RAW Capture
DxO Optics Pro 10 Clear View Version
In future posts I hope to compare the DxO Optics technology with that of Photoshop, once Adobe release their magic in the next release.

Saturday, March 28, 2015

Know your basics

As those who read my posts know, I try and pass on my experiences, that I have derived though lots of reading and making many mistakes, in this blog. In saying this, I encourage all photographers to seek out (and share) their workflow. After all, there is no such thing as the ‘perfect’ approach; there are as many perfect ways of doing things, as there are photographers.

One thing I’ve noticed when I scan the Magic Lantern forum, is the number of ML users that have difficulty with the ML enhancements, eg Auto-ETTR and dual-ISO, because they don’t appear to appreciate some of the ‘non-ML’ basics, especially dynamic range. In other words they are trying to ‘over drive’ the ML enhancements.

As an example, you will often see references on the ML forum to “pink artefacts” after processing a Dual-ISO capture. These references tend to be associated with very high dynamic range scenes, ie beyond the Dual-ISO capability.
 

Thus, IMHO, ML users run into difficulty when they don't fully appreciate the DR of the scene and/or their camera’s limits. As a reminder the (usable) DR may simply be stated as the brightness ratio between the lightest details you wish to capture and the darkest details.

Of course, the quality of your final image is highly dependent on the quality of the data you capture. If the quality of your in-camera captured data is poor, you are virtually guaranteed a poor final image. Data quality can only be degraded in post processing, never enhanced. Entropy will always win!

As we all know, photography is very simple: compose the scene, focus the lens, set the exposure, and push the shutter button.

But as has been discussed in some of my previous posts, to elevate yourself to a higher level as a photographer takes vision and requires artistry: things that need to be found from within, and not from posts such as this one.

However, putting vision and artistry to one side, if the quality of your (digital) capture data is poor, no amount of post processing will help create an image you will be proud of; unless your vision was some blurred and contrasty abstract image :-)

Coming back to the ML forum, and the problems some appear to have, I thought in this post I would share with you how I approach exposure setting, noting I’m a Canon-guy and a believer in Magic Lantern enhanced photography: http://www.magiclantern.fm

After much experimentation, I have settled on a three layered strategy for ‘simple’ exposure capture, ie capture may be complicated by other needs, such as focus stacking, that sit on top of getting the ‘best’ exposure. Thus in this post I’m ‘just’ addressing (Canon-ML-based) exposure setting.

The key, first step, is to evaluate the scene, ie the scene’s DR over the areas you are interested in capturing. I personally use a 1 degree spot meter if a can, but fall back to my camera's spot if I don't have my external meter with me.

BTW if you are using a long lens you will approach a 1 deg spot, but with a wide angle this, obviously, will not be the case. For example, if your full frame camera has a spot metering diameter of, say, 6mm, which is not atypical, then the spot angle, with a 50mm lens, will be about 7 degrees. Thus to turn your camera’s spot meter into a 1 degree spot, you will need to put a 300-400mm lens on. If you don’t know your camera’s spot meter characteristics, now might be a good time to find out.

Once I understand the scene's DR I decide on my capture strategy, according to the DR capability of my camera. For example, here is a very telling plot from Roger Clark at www.clarkvision.com, for a Canon 5D Mk II.

As can be seen, up until about ISO 1600, the DR capability of the 5DII is between 10.5 and 11.5 stops. Remember that ISO is a relative gain and has nothing to do with sensitivity or true exposure. ISO is simply a post sensor gain.

This plot also tells other interesting facts about the 5DII, which are generic to all digital DSLRs; that is, beyond a certain ISO, ie 1600 in this case, you are well advised to adopt a different exposure strategy, reflecting the change from electronic to sensor limited noise. That is, in the case of the 5DII, confidently use an ETTR approach below 1600, but not above 1600, ie underexpose here in preference to using ETTR. Also note banding in the transition zone indicates you may be need to raise ISO to 3200, ie away from 1600, so that sensor read noise swamps the banding.

For those that really want to know more about their cameras, I can’t do better than point you at Roger’s site.

Ignoring all the theory: what about the practice, and my three strategy layers?

For a low DR, ie covered by a single, non-Dual and ‘low’ ISO image, I will simply use ML's A-ETTR. This exposure strategy is guaranteed to give me the ‘best’ data for low ISO shooting. For high ISOs, ie above 3200, say, I will switch off A-ETTR and simply underexposure (to achieve the desire shutter speed) and recover the exposure in post.

For a scene with a 'medium' DR, eg 3 stops, say, on top of my Canon’s intrinsic capability, I will use A-ETTR with Dual-ISO. I very rarely use the Dual-ISO extra S/N features, as these take control away from me. I simply, use A-ETTR (with the base ideally at ISO 100) and switch Dual-ISO to 3Ev, ie the Dual scans are taken at ISO 800.

Finally, and always on a tripod, I use ML auto bracketing for very high dynamic range scenes, or scenes where I’m not sure of the DR and wish to give myself some insurance. Such scenes will likely be landscapes, especially towards sunset or sunrise, and indoor scenes, such as in churches.

In these cases, I first meter the darkest area where I wish to capture detail and set this as my base exposure. Then I'm guaranteed that ML auto bracketing algorithm will capture the best bracket set. What you don't want to do, IMHO, is to start ML auto bracketing 'in the middle'. It is much better to take control of the shadow capture and let ML ensure the highlights are covered.

As an example, I just shot this demo image for this post. I used my Canon 5DIII with a 24mm lens set to F/16 and focused just beyond the hyperfocal distance, ie at 8ft. I spot metered with my Sekonic L-758DR at the fireplace, and used this 1.6s exposure as my starting point. ML’s auto bracketing then added another three exposures at 0.4s, 1/10s and 1/40s.

After ingesting into LR, I exported the four images to LR/Enfuse and finished off in DxO OpticsPro 10.

I hope the above is of some value to those experimenting with ML based exposure capture. The key takeaways being, know your sensor’s limits, estimate your scene’s dynamic range and adjust your exposure strategy accordingly, ie A-ETTR, A-ETTR with Dual-ISO, Auto-Bracketing from a shadow base.

Sunday, March 22, 2015

City Lights

Last week I had a chance to visit Vegas and an opportunity for some night photography. In the end I only managed to grab a couple of images.

I traveled light, with my Sony A6000, but took my new 12mm full frame fisheye with me.

The image below is a 25 sec exposure, where I was trying to capture the car lights streaking past. I defished using ViewPoint 2 and ‘finished off’ in LightRoom.

It’s OK, but I need to do better!


Saturday, March 14, 2015

Changing your Perspective

Although Photoshop CC provides a very impressive foundation for post processing, there is always space for a few plug-ins.

In previous posts I have mentioned some of my ‘go to’ plug-ins, eg Color-Efex Pro 4 and Fixel Contrastica; in this post I suggest another ‘go to’ plug-in: DxO Lab’s ViewPoint 2.

Although you can shift perspective in Photoshop, DxO VP2 provides you a really powerful plug-in for PS and lR; and it’s on offer at the moment at $49: https://shop.dxo.com/login_product.php#dvp

There are several good videos on line on how to use VP2, eg https://www.youtube.com/watch?v=bDmENSA7jsA

So what can you achieve?

These two images ( RAW plus processed) show the 
power of DxO VP2 to help you ‘shift perspective’. The images were both taken at a shutter speed of 25 seconds.

Bottom line: I can recommend DxO ViewPoint 2 as a great adjunct to PS and LR.


Saturday, March 7, 2015

Working in the LAB


For normal colour image working I only tend to use LAB colour mode for colour correction or to bring out some ‘colour pop’. Like many, most of the time, I work in RGB colour mode . For instance in Lightroom this is the only colour space you can work in, whilst in Photoshop you can work in different colour spaces, eg: RGB, the normal/default colour mode; and CMYK mode, which is usually used for professional printing.

When you convert your image to Lab Colour mode, the colour Channels change to show ‘Lightness’, ‘a’ and ‘b’. Lightness is like a black-and-white version of the image, while ‘a’ and ‘b’ represent all the colours, including colours that ‘don’t exist’!

LAB Mode Colour Space
Crucially, this means that you can enhance colour and detail independently of one another, producing a vibrancy of colour that wouldn’t be possible in RGB mode.

Why is this important?

As mentioned above, in LAB mode colour casts are relatively easy to correct. Also, if your image is rather ‘flat’ in colour space, LAB processing will help separate out the limited colours that are present.

If you are processing for digital Infra-Red: you will have both of these issues to correct: a large red colour cast, that can’t readily be corrected via the temperature sliders, and, once the red colour cast is eliminated, you will have a very narrow colour range, especially if your IR conversion is 720nm of longer.

It is worth mentioning up front, that if you desire to carry out monochromic processing, ie eliminate colour from the image, then what follows is not that important. Having said that, if you are using, say, Silver Efex Pro II to carry out your B&W conversion, or Lightroom come to that, you may still wish to colour correct and/or channel swap your image.

In this post I’ll illustrate a very basic  IR, LAB-based processing workflow, using  the following image from my 720nm converted, 50D. Also, to further illustrate the power of a LAB-based workflow, I won’t bother to undertake any camera calibration, ie I’ll just work on the IR RAW image in Photoshop. Note that the exposure was set for this capture using Magic Lantern Auto-ETTR, hence the exposure is skewed to the right, but there is no overexposed highlights. The ETTR capture ensures we have the ‘best’ available tonal density to play around with.
RAW, as captured. image
Once the image is in Photoshop, the first thing to do is to move from RGB (the default) to LAB colour mode. This is achieved under the Image>Mode menu. Nothing will change in the image.
 
My first correction step is to carry out an a/b ‘channel swap’, as I wish to drive my sky to be blue: I tend to use the sky as my reality-touchstone when processing colour IR images.  As there is no channel swap available in LAB mode, the easiest way to achieve this is via a curves adjustment layer.

Once the curve adjustment layer is in place, simply invert the a and b channel  curves by moving the left hand extreme to the top and the right hand extreme to the bottom.  The linear curve should now be slopping down from left to right, rather that up from left to right.

The image will look horrible, because of the inverted red cast. The next step is to correct this.

Basic colour correction can be achieved by moving the black and white points on the base curve in, towards, the middle. You will need to play around with both a and b channels. Also, because you are in LAB mode, you can be aggressive with your slider movements, but try and remain reasonably symmetrical, else you will introduce additional colour casts.

Further curve corrections can be carried out by shaping the curve. Unlike an RGB curve, a LAB curve can be ‘insulted’ a lot, before you have ‘problems’. The following shows the base corrections, achieved with a single LAB curves adjustment layer, showing the b channel adjustment curve.
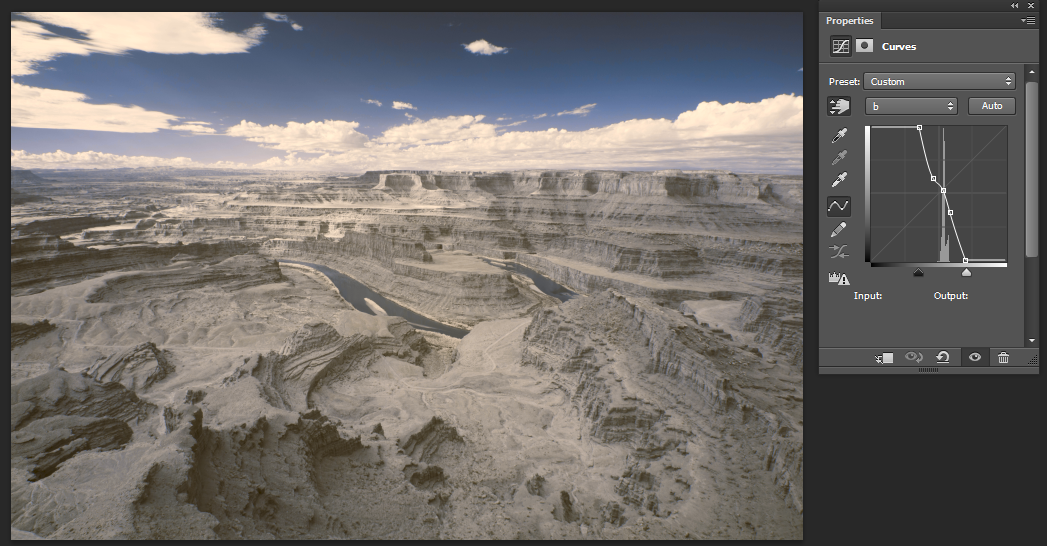
Basic colour correction using LAB mode
This is step one in the post processing, ie colour correction and basic colour ‘creation’. Additional processing will be required to make a final image. We will discuss subsequent processing steps in future posts, eg making use of luminosity masks etc.

Bottom line: if you wish to create colour (sic) IR imagery, you will be well served by learning about a LAB-based processing workflow. In future posts I will explore LAB processing in more detail. However, I hope this basic introduction has helped convince those die-hard RGB post-processors, that there is more to life in LAB colour space!

Sunday, March 1, 2015

Playing around in the snow

This last week has been an interesting one.

First I had my third eye operation in the space of a year. Then we had a foot on snow.

However, the recovery period and the snow gave me a chance to try out a few specialist image making techniques.

So I decided to use my IR converted 50D with my 14mm Rokinon, capture three images at 1.6, 2.6 and 8 ft (as computed by the FocusStacker App), and process the resultant focus brackets using Helicon Focus and finally ‘colour correct’ and adjust with Photoshop in LAB space.

Well I can report the experiment was a great success. The (boring) test image is sharp from a foot to infinity and the workflow above went well. For example, Helicon Focus is integrated into Lightroom.

I was most impressed with Helicon Focus, as I needed to address some branch tip (wind induced) movements. In HF all I needed to do was simply paint away the ghosts. But note I didn't do them all :-)

Bottom line: once you have a workflow and the right tools, creating, what at first seems to be a complex image, is really quite simple.